
Visual Editing Basics
If you want your own site see installation instructions or signup a managed service.
Visual Editing
Plone Volto has a very unique CMS editor that lets you type directly into the page similar Notion or Medium. Pages are made up of blocks that can be arranged in a layout. You can edit a page by browsing to it and clicking the pencil icon on the left toolbar. None of your changes are saved until you click save so the cancel button can be used to abandon changes. In addition there is undo and redo if you make a mistake while editing.
Blocks/Components
A page is composed of "Blocks" which often correspond to NSW Design System Components.

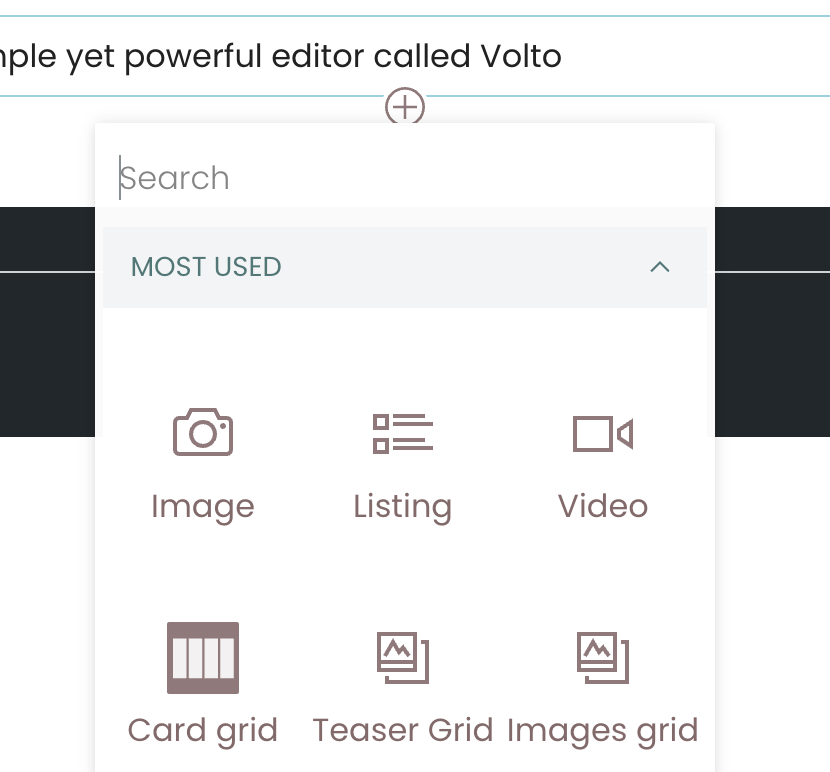
You can add a block by clicking on the block above it and then clicking on the "plus" button and choosing which block you want to insert
Hitting "Enter" will also insert a block below the current one. "/" is a shortcut to pick which block type you want
Blocks can be dragged and dropped using the drag marker on the left and deleted using the "Trash Can" icon.
To move blocks to another page, use shift or "cmd/ctrl" to select multiple blocks and then use cut from the toolbar to cut the blocks into the clipboard. Select a block on this, or another page, and "paste" from the toolbar and the blocks will be pasted after the selected block.
Block Settings

- Most Blocks let you edit them directly and many also have additional settings on the right sidebar, under the "Block" tab.
- Text blocks have an additional formatting toolbar that appears if you select a word, allowing you to format text, create headers, links of bullets.
- Not all blocks have settings, for example the Title and Text blocks have no settings
- The right side bar can be hidden if needed by clicking on the middle of its seperator (as can the left toolbar)
Select text to apply formatting
You can create page sections using the sections block setting (NSW DS only)
Page Settings/Content metadata
In the right sidebar, in the first tab, there are settings for the content. Almost all content types have
- Title - this appears in listings, searches, navigation and you can use the "Title Block" to have the tile appear on a page as a H1 Header.
- Summary - a one paragraph summary of the content. Also appears on search (unless a keyword is used) and listings. You can use the description block to have this appear on the page so you don't need to type the text in two places.
- Preview Image - An image you can optionally have appear in in listings and searches
- Short name - allows you to change the url of the content
- Exclude from naviation - Prevents the item from appearing in top level navigation
- Categorization - You can use tags to help either internally organise your content, or make this user facing by using a Search Block with a Tag facet or show tags in listings. In a later version you will be able to make tags appear on the page itself. Related items is currently unsed but will be allow for displaying a user picked set of items in a special block in the future.
- Dates - Publication date is set automatically when you publish and can be used in Search and Listing Blocks. You can also adjust it normally. Expiry date can be useful in listings and search blocks to prevent the item showing up however the item can still be seen if there is a direct link to it.
Some content types have addition metadata (like Events). An administrator can customise the metadata fields on your content types using the "Content types" control panel as well as add additional Content Types.
Publishing and workflow
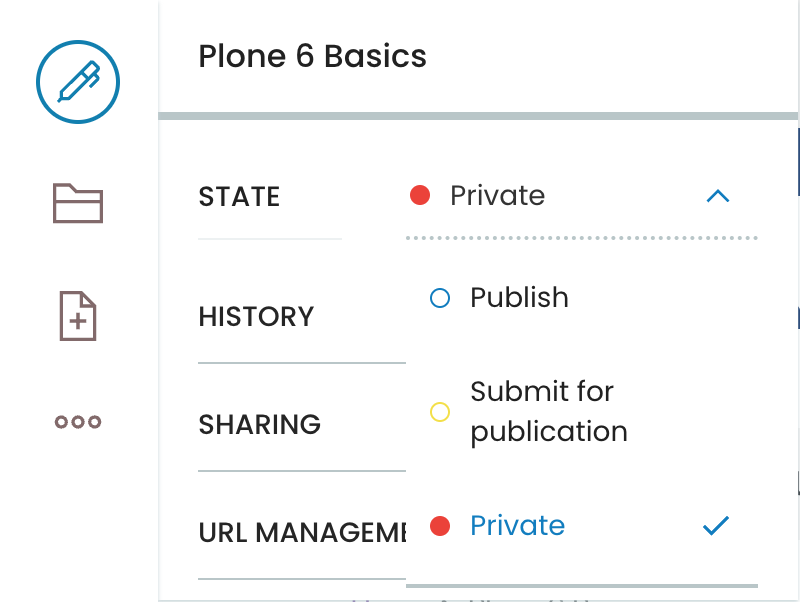
- Once you have saved a page you will need to publish it as new Pages are Private by default
- Pages you create will automatically appear in the top level navigation.
- Use "Exclude from navigation" in the Page settings if this isn't desired.
- You can create a subpage of a page by clicking "Add > Page". Pages are both a folder and a Page in Plone 6.
- You can restrict content to certain logged in users by keeping the Page state "Private" and using the Sharing tool to add users or groups permissions
- You can publish items in bulk using the "Contents" tool.
Navigation Menus and structure
Plone works differently for many other CMS's. Instead of creating content and then adding it to menus there is a heirachical structure you place your content into and the menus automatically reflect the internal structure. This has several implications
- you need to decide where your content should appear before you create it
- to change the menu structure involves moving content or adding "link" objects
- to change a url of an object you need to find the parent of the part content and change its short name.
- to create a submenu or longer url you create a content when viewing the page you want as parent.
Managing Content with the Contents Tool
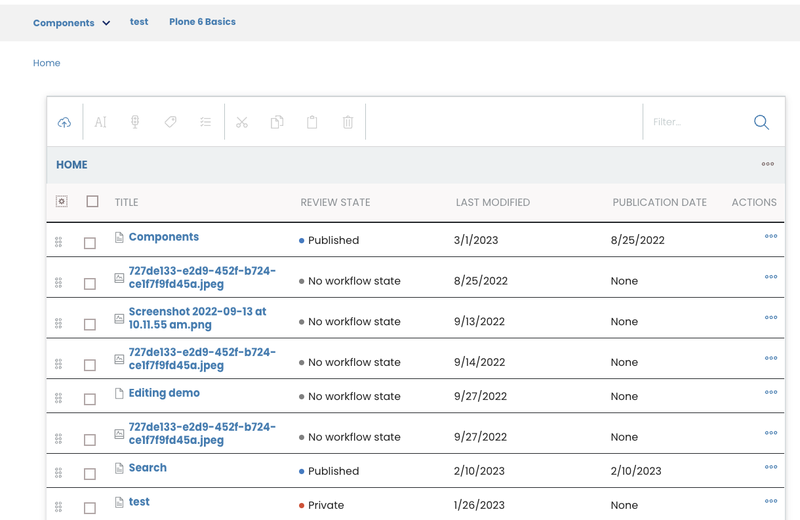
The folder icon on the left toolbar is the "Contents" tool. The contents tool allows for bulk renaming, moving, reordering, duplicating and uploading of content.
Cut/Copy/Paste - moving content
You can move content/pages around the site using Cut and then Paste. Select the items using checkboxes, click cut, navigate to the folder you want to move the items and then paste. Not cut won't immediatly remove the items from the old location until you paste.
Note: this doesn't copy content to your computer clipboard and allow you to paste into other applications
Plone will automatically add redirects for moved content so any external urls pointing to it's old url will still work. You can view these redirects under "URL Management" either via the toolbar or the control panel
Copy allows you to duplicate content but it also won't create the copy until you click paste in the desired location.
URL Management/Rename
Each item has a "short name" and a "Title". The "short name" is what appears in the url. The full url path is made up of the short name of the item, then the "short name" of the folder it's in and so on up to the site root. If you want to edit this url you need to rename the item or parent pages until you have the url you want.
Renaming is done in "Contents" via the selecting the item and clicking rename. It can also be done while editing an item under the metadata tab on the right sidebar. Renaming will automatically add redirects for the old urls so external links using that url will still work.
Deleting
To delete an item you are currently viewing
- Note the title of item you are viewing
- go to contents (folder icon on the left toolbar)
- use the contents breadcrumbs to move up to the parent item
- find the content you wish to delete
- You can find an item by using "show all" in the bottom right and using the browser's find feature to search for the items title
- In the future you will also be able to use the filter by id or title in the top right to more easily find this item
- select it and then click delete.
- NOTE: There isn't an easy way to recover a deleted item so do this carefully
- If you did delete something by mistake then see "Transaction Undo" below. this needs to be done as soon as possible after the mistaken deletion to ensure no other content changes also need to be undone.
If you would like to redirect external urls that pointed to that deleted content,
- go to the item you want to redirect to,
- use "URL Management" from the left toolbar
- enter the path of the old url of the content you just deleted.
Navigation menus/Ordering
The order of items inside a parent page can be controlled by dragging items up and down in the Contents tool. This is how you get a different order in the top level navigation menu. You can also use a listing block and choose to sort it by contents order.
If you would like to hide an item from the top level navigation, there is a setting for this when you editing the content. In the page settings.
If you want to add an item to a menu that is located in another folder, either move the item or you can use can create a Link content in the place in the menus you want the content to appear and set it's target to the actual location of the content. In this case the user will be redirected into the new location after they click on the menu item since content can't be in two places at once.
Bulk Upload
There is a bulk upload tool in the top left of the "Contents" tool. It allows you to drag and drop files from your desktop or click and select files to upload. It will give the files a "short name" using the filename but you can use rename to change this after.
Alternativelly you can use "Add > File" to create file content one by one.
During editing you are also able to upload Images and Videos directly into blocks. Note however this will create file or image objects.
- If you upload images to a page before its first saved it they will appear in the parent. You can safely move these into the page where they are used without a problem due to Plone's automatic linking.
History and Transaction Undo
In the left sidebar is a "History" tool that allows you to view the publication and edit history of Pages.
You can view the differences between two revisions of a page, view the page as it was at that version or choose to rollback the content to an old version
You can also undo other actions using the "Control Panel > Undo" tool however this will often not work unless it's done soon after the change you want to undo. This will undo the full transaction and if later transactions touch that same data then the undo will fail unless you undo all of those transactions as well.
You can view the transactions on a specifc content or section by selecting "sort by path" and typing in the path to view.
Managing Users, Groups and Permissions
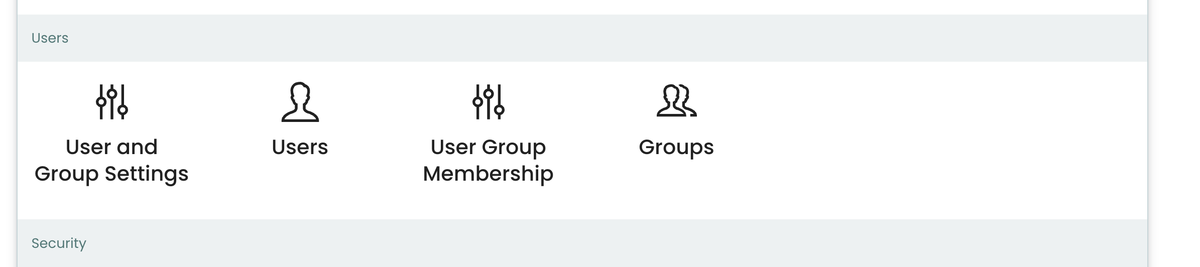
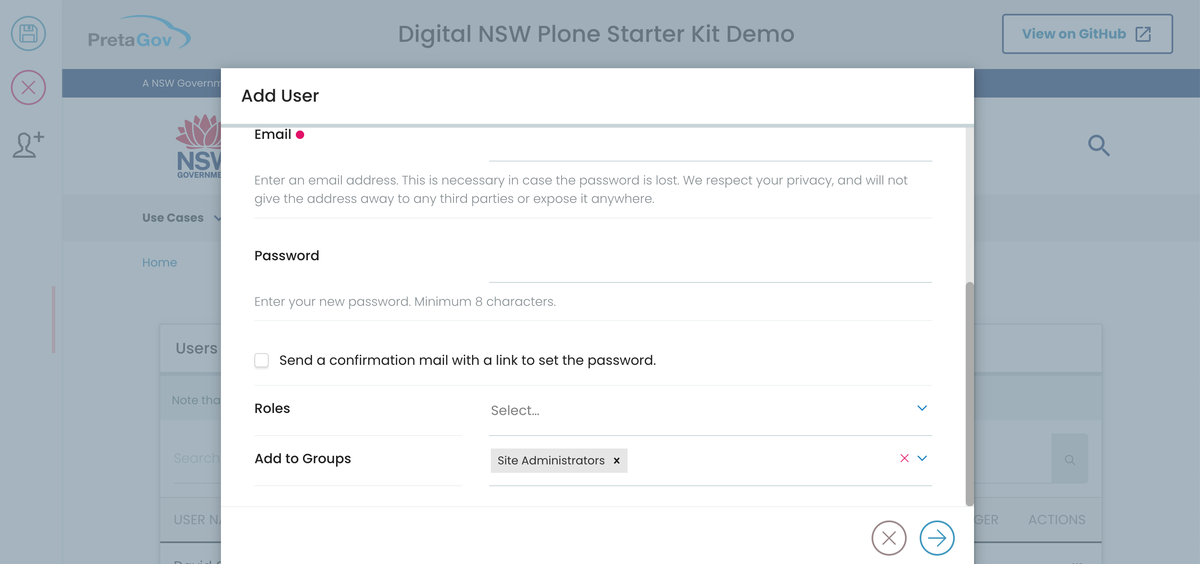
If you are a Site Manager or Manager then you can add new users in the control panel.
- Go to "Site Setup > User > (Add icon on the left sidebar)
- Type the full name of the user and email.
- It is recommended to not enter a password and instead tick "send confirmation email" as this will let the user pick their own password
- Note: if the user doesn't click on the link in the email within a few days, they can get another link themselves using the "forgot password" link on the login page
- You can also assign roles or a groups however groups is recommended
When adding a user can assign them Permissions (called Roles) and/or add them to a group. A group is a way of centrally managing permissions for many users at once so it will make life easier in the long run to assign users to groups and add users to groups instead of giving users Permissions (Roles) directly. Groups can also be members of other groups providing a lot of flexibility.
To add a new group
- Go to "Site Setup > Groups > (Add icon on the left toolbar)
- Give the group a meaningful name
- Assign the group permissions or leave empty if you want to assign permissions for only some content. (see fine grain permissions)
- You can now use the group name in place of the username in places such as "Sharing"
To Change the permissions of a group
- Go to "Site Setup > Groups"
- Search for the group
- Tick or untick the permissions (roles) as needed
- Save
To add or remove a user from a group
- Go to "Site Setup > User Group Membership"
- Search for the user
- Assign the user to the group using the tickbox
- save
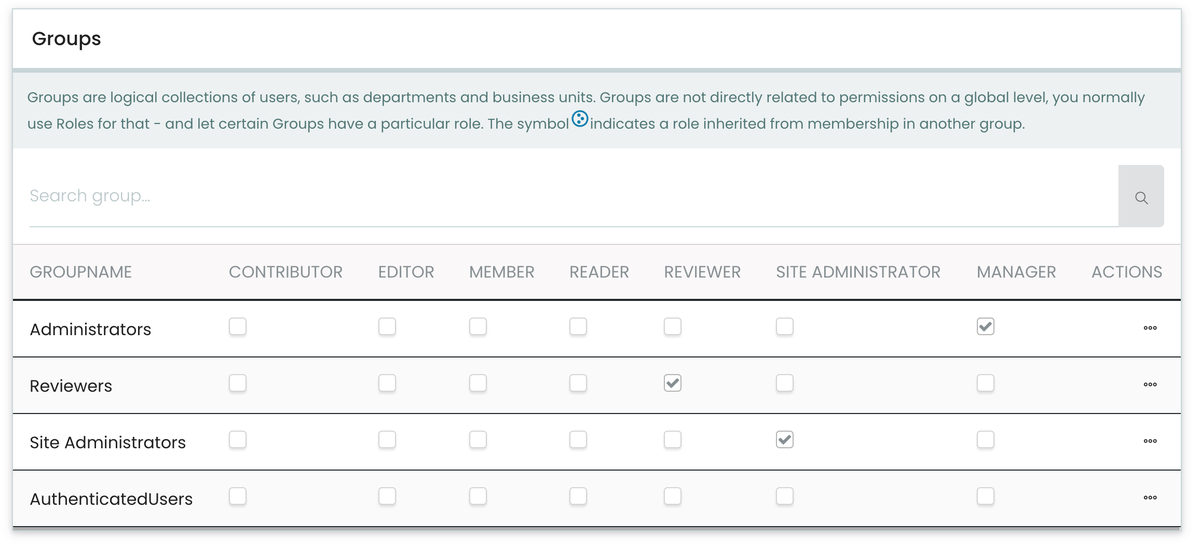

The permissions (roles) are
- Administrator - Complete access
- Site Administrator - Can manage users
- Reviewer (Can Review) - Can publish content submitted for review
- Editor (Can Edit) - Can edit/remove other published content
- Contributor (Can Add) - Can create new content but can only edit content they create
- Reader (Can View) - Gives access to private content
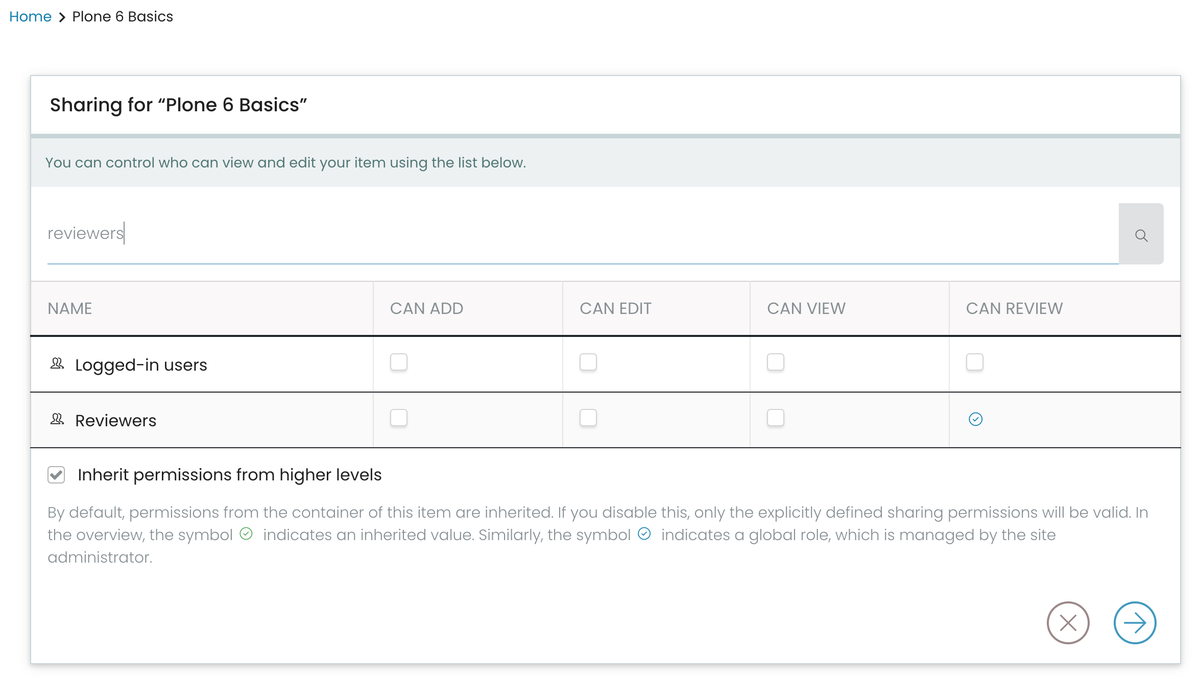
Fine Grained Permissions/Delegation
If you don't want to give permissions globally there are fine grained permissions for groups or users on a page, or section level, using the "sharing" action. This allows you to let a group of users maintain certain parts of the site based on the site structure. In addition if you give them "Can Add" access then give another group "Can Review" access then it means you can have contibutors who need to be approved before their content is published.
If a group is given "Can Edit" permission it means they can edit currently published content without a review step. If you require a review step then use of the working copy plugin allows users with "Can Add" to be able to create a copy of the currently live page to be worked on and reviewed before it will replace the live version.

Futher reading
Documentation on all the NSW Design system components that have been implemented in Plone 6
A powerful feature of Plone is create autmatically updating listings of content from other parts of your site
Cards, linked lists and other groupings of related content that you can fully configure
Simple form builder to email or save collected answers
The plone communities official user documentation
Plone 6 you can login into and try (without the NSW Design system)